Tel/WhatsAapp:+86 13366396425
E-mail: chloe_xia@vleap.com.cn

Who this guide is for: brand founders, product developers, and sourcing managers who receive custom handbag samples from their factory and need to evaluate them systematically, write revision feedback that the factory can execute precisely, and close the sample-to-bulk approval in two revision rounds, not five. If you have ever sent feedback saying “can the leather be softer?” or “the color is slightly off” and received a second sample that was different but still wrong — because the factory interpreted your vague language differently than you intended — this guide replaces gut-feel review with a structured evaluation protocol and replaces vague feedback with a revision-brief format that leaves no room for misinterpretation.

The sample is the most expensive document in custom handbag development. Not in material cost — in time cost. Every revision round consumes 7–14 days (sample production + shipping + evaluation + feedback + next production). A project that closes in two rounds reaches bulk approval in 4–5 weeks. A project that drifts to five rounds reaches approval in 10–14 weeks — and by then, the market window may have closed, the buyer’s enthusiasm may have faded, and the project may die not from a bad product but from development fatigue.
The difference between two rounds and five rounds is almost never the factory’s capability. It is the clarity of the buyer’s feedback. A factory that receives “the handle feels wrong” will guess what “wrong” means, make a change, and send a second sample that is different but still not right — because the factory interpreted “wrong” as “too stiff” when the buyer meant “too short.” A factory that receives “handle drop: increase from 18 cm to 22 cm; handle core: switch from plastic tube to cotton rope for softer grip; edge paint: match Pantone 19-1118 (currently too warm — appears 19-1118 but should be 19-1015)” will execute all three corrections in a single round and the second sample will be right.
This guide provides the evaluation protocol and the revision-brief format that produce the second kind of feedback — specific, measurable, executable, and convergent.
Before the protocol, understand why projects spiral beyond two rounds:
| Cause | What Happens | How It Wastes a Round |
|---|---|---|
| Vague feedback | The buyer says “the leather feels cheap” without specifying what “cheap” means (too thin? too stiff? wrong texture? wrong sheen?) | The factory guesses — changes the texture when the buyer meant the thickness; the next sample is different but still wrong |
| Incomplete feedback | The buyer notes the handle problem but misses the lining color, the hardware finish, and the pocket placement; the factory fixes the handle and ships; the buyer sees the other issues on the next sample | Each round reveals NEW issues that should have been caught on the first review; the project never converges because the issue list keeps growing |
| Contradictory feedback | The buyer says “make the bag more structured” AND “the leather should feel softer” — these two requests conflict (more structure = firmer interlining = stiffer feel); the factory cannot satisfy both | The factory compromises in a direction the buyer did not intend; the next sample fails differently; the buyer sends new feedback that contradicts the previous round’s |
The fix: a structured evaluation that catches EVERY issue on the first review (preventing cause #2), a specific measurement-based language that eliminates ambiguity (preventing cause #1), and an internal consistency check that identifies contradictions before sending feedback (preventing cause #3).
When the sample arrives, resist the instinct to open it, glance at it, and fire off an email. Instead, work through seven evaluation stations in sequence — each station examines a specific dimension of the sample, and each produces a documented finding. The entire protocol takes 15 minutes.
What you do: remove the sample from its packaging. Hold it at arm’s length. Look at it for 5 seconds without touching it.
What you are evaluating: the visual impression — does the bag look like what you envisioned? Does the silhouette match the tech pack? Does the color look correct under the light you are in?
What you document: your gut reaction in one sentence. “First impression: the silhouette is correct but the color appears too warm.” This first-impression note is valuable because it captures the consumer’s perspective — the consumer will also form her impression in the first 5 seconds.
Important: do NOT send this first impression as feedback. It is a note for yourself. The detailed stations that follow will either confirm or correct it.
What you do: with a measuring tape, verify every dimension specified in your tech pack. Measure and record:
| Measurement | Where to Measure | Tolerance |
|---|---|---|
| Overall width | The widest point of the bag, measured flat (front panel) | ±1 cm |
| Overall height | From the base to the top edge (excluding handles) | ±1 cm |
| Depth / gusset width | The widest point of the gusset | ±0.5 cm |
| Handle drop | From the top of the handle arch to the top edge of the bag | ±1 cm |
| Handle length (if shoulder strap) | Full strap length, end to end | ±2 cm |
| Strap width | At the narrowest point | ±2 mm |
| Pocket dimensions (exterior) | Width × height of each exterior pocket | ±0.5 cm |
| Pocket dimensions (interior) | Width × height of each interior pocket | ±0.5 cm |
| Base dimensions | Length × width of the base | ±0.5 cm |
What you document: every measurement that is outside tolerance, with the tech pack target and the actual measurement. Example: “Handle drop: tech pack specifies 22 cm. Actual: 18 cm. REVISE to 22 cm.”
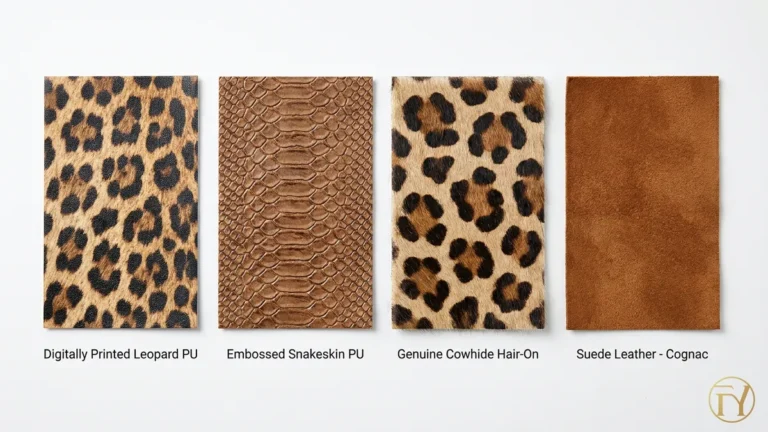
What you do: evaluate every material on the sample against your specification.
| Material Check | How to Evaluate | What to Document |
|---|---|---|
| Exterior material type | Is it the material you specified (the specific PU, leather type, nylon, canvas)? Does the texture match the approved swatch? | “Material: correct PU, pebble texture matches swatch” or “Material: specified saffiano PU; received smooth PU. REVISE.” |
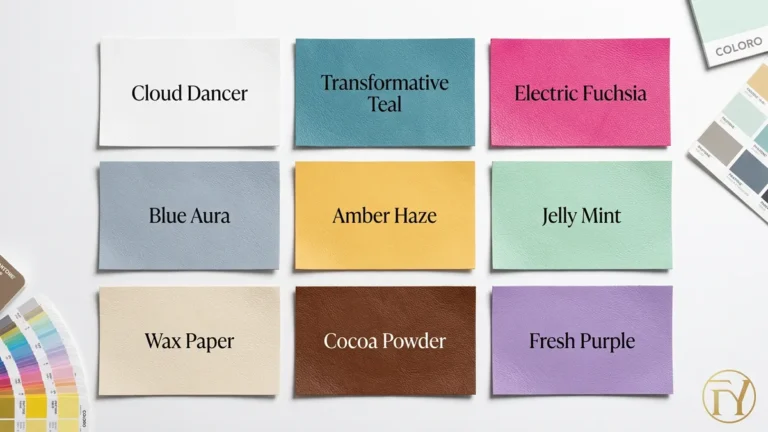
| Exterior color | Hold the sample next to your Pantone reference (TCX swatch) or approved lab dip under D65 light (daylight or a daylight-balanced light). Does the color match? | “Color: matches Pantone 19-1118 under D65. APPROVED.” or “Color: appears 1–2 shades too warm vs. Pantone 19-1118. Request re-dip.” |
| Lining material | Open the bag. Touch the lining. Is it the weight, weave, and color you specified? | “Lining: specified polyester twill 100 g/m²; received taffeta (too thin, too shiny). REVISE to twill 100 g/m².” |
| Lining color | Compare to your lining color specification | “Lining color: specified Pantone 19-4005 (navy). Received: matches. APPROVED.” |
| Hardware finish | Compare every hardware element to your specification (polished gold, brushed, matte, antique) | “Hardware: specified brushed gold. Received: polished gold (too shiny). REVISE to brushed/satin finish.” |
What you do: systematically inspect the construction — stitching, edges, seams, pocket attachment, handle attachment, closure function.
| Check | What You Are Looking For | How to Evaluate |
|---|---|---|
| Topstitching | Straight, even, consistent SPI, no wobble, no thread bunching | Run your eye along every visible stitch line; measure SPI at 3 points with a ruler (count stitches per inch) |
| Edge finishing | Smooth, uniform, tonal-matched, no visible drips or thin spots | Run your thumb along every exposed edge (handles, straps, flap, body edges) — the “thumbnail test” |
| Seam alignment | Panels meet cleanly; the bag is symmetrical; no puckering at seams | Hold the bag at arm’s length; check that the left and right sides are mirror images; look for puckering at the corners and gusset seams |
| Pocket construction | Pockets are positioned correctly, open cleanly, close securely | Open and close every pocket; insert your phone to verify fit; check the zip function on every zip pocket |
| Closure function | The magnetic snap, turn-lock, zip, or buckle operates smoothly and holds | Open and close the main closure 10 times; verify it holds securely when closed |
| Handle / strap attachment | Firmly attached; no visible stress; bartack or reinforcement visible (if the construction allows inspection) | Tug each handle with moderate force; verify no give, no puckering at the attachment |
| Interior finish | Lining seams are serged or bound; no raw edges; label is positioned correctly | Reach inside; run your fingers along every seam; check for raw-edge fraying |
What you document: every construction issue, with its location and the specific correction. Example: “Topstitching on the left handle: wobbles 2 mm off the edge at the lower 3 cm. REVISE — stitch line must be parallel to the edge within ±0.5 mm.”
What you do: use the bag for 2 minutes. Load it with your typical contents (phone, wallet, keys, sunglasses, cosmetics pouch, a book or tablet to simulate weight). Carry it. Set it down. Pick it up. Open and close it. Adjust the strap.
| Functional Check | What You Are Evaluating |
|---|---|
| Does the bag stand upright when set down? | Base stiffener and structural adequacy |
| Does the loaded bag hang level from the handles/strap? | Handle/strap center-of-mass placement |
| Can you access the main compartment with one hand? | Opening width and closure ease |
| Can you find your phone in the interior without looking? | Interior pocket placement and accessibility |
| Is the strap comfortable on your shoulder? | Strap width, padding, and non-slip quality |
| Does the bag tip over when set on a table with light contents? | Base width and weight distribution |
What you document: every functional issue, with the specific fix. Example: “Bag tips forward when set down with light contents (phone + wallet only). The base width is adequate but the front panel is heavier than the back (the flap hardware pulls the center of gravity forward). REVISE — add 2 mm of base board extension at the front, or reposition the strap attachment 1 cm rearward to shift the balance.”
What you do: place the sample next to your tech pack. Go through the tech pack line by line and verify every specification against the physical sample. This is the catch-all that finds issues the other stations may have missed.
| Tech Pack Line | Sample Status | Note |
|---|---|---|
| Material: saffiano PU, cognac | ✓ Correct | — |
| Zipper: YKK, #5, gold teeth | ✗ Teeth appear silver, not gold | REVISE: gold teeth per spec |
| Interior label: woven, 3 × 5 cm, positioned at back wall zip pocket | ✗ Label is positioned at the slip pocket, not the zip pocket | REVISE: move label to zip pocket per spec |
| … | … | … |
What you do: photograph the sample from 8 standardized angles, plus close-ups of every issue you documented.
| Shot | Angle | Purpose |
|---|---|---|
| 1 | Front, straight-on | Overall silhouette and proportions |
| 2 | Back, straight-on | Back panel, back pockets |
| 3 | Left side | Left gusset, left strap attachment |
| 4 | Right side | Right gusset, right strap attachment |
| 5 | Top-down (looking into the open bag) | Interior layout, pocket positions, lining |
| 6 | Base (bag flipped upside down) | Base construction, base feet, base board |
| 7 | Handle/strap detail | Handle construction, edge finishing, attachment |
| 8 | Closure detail | Closure hardware, alignment, function |
Plus: close-up photos of every issue, with a ruler or Pantone swatch in the frame for scale and color reference. These photos are your evidence; they are worth more than any written description.
Annotate the photos: use a simple image editor (or print and mark with pen) to circle the issue and add a note. “This edge: too warm — match Pantone 19-1015, not 19-1118.” Send the annotated photos WITH the revision brief.
The revision brief is a structured document — not a casual email — that communicates every change the factory must make, in a format they can print, pin to the workstation, and execute line by line.
SAMPLE REVISION BRIEF

Brand:          [Your brand name]
Style:          [Style name / number]
Sample round:   [Round 1 / Round 2]
Date received:  [Date you received the sample]
Date of brief:  [Today's date]
Reference:      [Tech pack version; approved lab dip reference;
                 approved material swatch reference]

OVERALL STATUS: [APPROVED / APPROVED WITH MINOR REVISIONS /
                 REVISIONS REQUIRED / REJECTED — RESTART]

────────────────────────────────────────────────────
SECTION A: DIMENSIONS (changes required)
────────────────────────────────────────────────────

A1. Handle drop
    Current: 18 cm
    Required: 22 cm
    Action: INCREASE handle drop by 4 cm
    Photo: [attached, annotated]

A2. [next dimension change...]

────────────────────────────────────────────────────
SECTION B: MATERIALS (changes required)
────────────────────────────────────────────────────

B1. Lining material
    Current: Polyester taffeta (thin, shiny)
    Required: Polyester twill, 100 g/m² minimum
    Action: REPLACE lining fabric
    Reference: [tech pack page X, lining spec]

B2. Hardware finish
    Current: Polished gold
    Required: Brushed/satin gold
    Action: CHANGE hardware finish on ALL hardware
            (zipper, snap, D-rings, buckle)
    Photo: [attached — current polished vs. target
            brushed reference image]

────────────────────────────────────────────────────
SECTION C: COLOR (changes required)
────────────────────────────────────────────────────

C1. Exterior color
    Current: Appears 1–2 shades too warm under D65
    Required: Match Pantone 19-1015 TCX (the approved
              lab dip ALD-2026-03)
    Action: RE-DIP material to match ALD-2026-03;
            send new lab dip for approval before
            producing revised sample
    Evaluation: D65 daylight + 2700K warm light

────────────────────────────────────────────────────
SECTION D: CONSTRUCTION (changes required)
────────────────────────────────────────────────────

D1. Topstitching — left handle
    Issue: Stitch line wobbles 2 mm off edge at
           lower 3 cm
    Required: Stitch line parallel to edge, ±0.5 mm,
              along entire handle length
    Photo: [attached, annotated]

D2. Edge paint — strap edges
    Issue: Edge paint too dark vs. body color (visible
           contrast at arm's length)
    Required: Edge paint tonal-matched to body,
              ΔE ≤ 2.0
    Photo: [attached — showing the mismatch]

────────────────────────────────────────────────────
SECTION E: FUNCTIONAL (changes required)
────────────────────────────────────────────────────

E1. Bag tips forward when set down
    Cause: Hardware-heavy flap shifts center of gravity
    Action: Extend base board 2 mm at front edge;
            OR reposition strap anchor 1 cm rearward
    Photo: [attached — showing the tipping]

────────────────────────────────────────────────────
SECTION F: APPROVED ELEMENTS (no changes)
────────────────────────────────────────────────────

F1. Silhouette and proportions: APPROVED
F2. Exterior material (texture): APPROVED
F3. Interior pocket layout: APPROVED
F4. Closure mechanism: APPROVED
F5. Base construction: APPROVED (except the
    front-extension note in E1)

────────────────────────────────────────────────────
SECTION G: ATTACHMENTS
────────────────────────────────────────────────────

1. Annotated photos (8 standard + issue close-ups)
2. Measurement comparison sheet (tech pack vs. actual)
3. Pantone reference swatches (taped to a card,
   labeled)
4. Approved lab dip (ALD-2026-03) — return with
   revised sample for side-by-side comparison

EXPECTED TIMELINE FOR REVISED SAMPLE:
[Discuss with factory — typically 7–10 days from
 brief receipt]
| Feature of the Format | What It Prevents |
|---|---|
| Numbered items with “Current → Required → Action” | Prevents misinterpretation — the factory sees what IS, what SHOULD BE, and what to DO; there is no ambiguity |
| Annotated photos attached to every item | Prevents “I can’t see what you’re referring to” — the photo shows exactly where the issue is and what it looks like |
| Measurements in centimeters (not “a bit more” or “slightly less”) | Prevents estimation — the factory has a number, not a feeling |
| Color referenced to Pantone TCX and/or ALD number | Prevents the factory from re-interpreting your color intention; the reference is specific and physically verifiable |
| Section F: Approved Elements listed explicitly | Prevents the factory from changing things you liked — without this list, the factory may “improve” an element you already approved, creating a new issue in round 2 |
| Structured sections (A through G) | Prevents the factory from missing an item buried in a long email paragraph; the sections organize by type and the numbered items create a checklist |
When the revised sample arrives, repeat the 7-station protocol — but this time, your focus is on verifying the specific corrections from your revision brief, not re-evaluating the entire bag from scratch.
| Check | Method | Pass / Fail |
|---|---|---|
| Every item in Section A (dimensions) | Re-measure every dimension that was corrected; compare to the “Required” value | Pass if within tolerance; fail if still outside |
| Every item in Section B (materials) | Verify the material substitution by sight and touch; compare to reference swatch | Pass if the material matches the specification |
| Every item in Section C (color) | Compare revised material to ALD swatch under D65 and 2700K | Pass if ΔE is within tolerance |
| Every item in Section D (construction) | Re-inspect every construction point that was corrected | Pass if the issue is resolved |
| Every item in Section E (functional) | Re-perform the functional tests that revealed issues | Pass if the functional issue is resolved |
| Every item in Section F (approved elements) | Verify that NO approved element has been inadvertently changed | Pass if all approved elements are unchanged |
| Outcome | What to Do |
|---|---|
| All items pass → APPROVED FOR BULK | Send written bulk approval: “Sample round 2 approved. This sample is the PP reference. Retain this sample as the golden standard for bulk production. Proceed with material procurement.” |
| 1–3 minor items fail → APPROVED WITH WRITTEN CORRECTION | If the failures are minor (e.g., one edge paint match is ΔE 2.5 instead of 2.0; one pocket is 3 mm narrow), approve the sample with written notes: “Approved for bulk with the following corrections applied to bulk production: [list]. No third sample required. Factory to implement corrections and verify on the first 3 production units.” |
| Multiple items fail or a fundamental issue persists → ROUND 3 REQUIRED | If the factory did not execute the corrections from Round 1, or if a material issue (wrong dye lot, wrong PU) persists, a third sample is required. Re-issue a revision brief following the same format. Investigate why the Round 1 corrections were not implemented — was the brief unclear? Was the material unavailable? Was the factory’s interpretation different? |
| Vague Feedback (Wastes a Round) | Specific Feedback (Closes the Issue) | Why the Specific Version Works |
|---|---|---|
| “The leather feels cheap” | “The exterior PU is too thin (current: ~0.6 mm estimated by feel). Specified: 1.0 mm PU. Replace with the specified 1.0 mm PU from the approved swatch.” | “Cheap” is subjective; thickness is measurable |
| “The color is off” | “The exterior color under D65 daylight is ~2 shades warmer than ALD-2026-03. Re-dip to match ALD-2026-03. Evaluate under D65 and 2700K.” | “Off” gives no direction; “warmer” + reference swatch gives the factory a target |
| “The handles are uncomfortable” | “The handle core is too rigid (current: plastic tube). Switch to cotton rope core, 8 mm diameter, for a softer grip. Handle width: maintain at 20 mm.” | “Uncomfortable” could mean too short, too narrow, too stiff, or too slippery; naming the core material and the desired alternative eliminates ambiguity |
| “Make the bag more premium” | “Upgrade edge finish from single-coat paint to 4-coat system (sealer + 2 color + clear coat) with beveling. Switch thread to tonal (current: contrast cream; required: matching body color within ΔE 3.0).” | “Premium” is a marketing term; edge layers and thread color are specifications |
| “The interior is disappointing” | “Lining: replace polyester taffeta with polyester twill, minimum 100 g/m², Pantone 19-4005. Serge all interior seams (current: raw edges). Add fusible interfacing strip at slip pocket opening.” | “Disappointing” does not tell the factory what to fix; the three specific changes are executable |
| “The hardware is wrong” | “All hardware: change finish from polished gold to brushed/satin gold. Zipper: change from plastic coil to metal teeth, gold finish, YKK or equivalent. Turn-lock: correct — no change.” | “Wrong” could refer to the finish, the type, the size, or the position; specifying each piece individually prevents over-correction |
When the sample passes Round 2 review, the approval must be formal, written, and specific. This document becomes the binding quality standard for bulk production.
BULK PRODUCTION APPROVAL

Brand:            [Brand name]
Style:            [Style name / number]
Sample approved:  Round [2], received [date]
Approval date:    [Today's date]

This sample is approved as the PP (Pre-Production)
reference for bulk production. The factory must retain
this sample as the golden standard.

APPROVED SPECIFICATIONS:
- All dimensions per attached measurement sheet
- Exterior material: [exact specification]
- Exterior color: matched to ALD-[reference number]
- Lining: [exact specification]
- Hardware: [exact specification with finish]
- Edge finishing: [exact specification]
- Stitching: [SPI, thread color, tolerance]
- [Any other critical specification]

APPROVED WITH THE FOLLOWING BULK CORRECTIONS:
[List any "approved with correction" items that must
 be implemented in bulk but do not require another
 sample]

GOLDEN SAMPLE RETENTION:
Factory must retain this approved sample in its
original condition as the reference for bulk
production QC. Buyer retains the second approved
sample (if two were produced) for incoming
inspection comparison.

NEXT STEP: Proceed with bulk material procurement
and production scheduling. Confirm bulk production
start date within 3 business days.

Signed: _______________  Date: _______________
| Phase | Duration | What Is Happening |
|---|---|---|
| Sample arrives at buyer | Day 0 | Shipping from factory to buyer (3–7 days express; or provided at factory visit) |
| Buyer evaluates + writes revision brief | Days 0–2 | The 7-station protocol + revision brief creation. Do not delay this. Every day you sit on a sample is a day added to the total timeline |
| Factory receives brief + procures materials | Days 2–5 | The factory reads the brief, orders any new materials needed (if a material change is required), and schedules the revision |
| Factory produces revised sample | Days 5–12 | The factory executes the revisions; produces the revised sample; ships |
| Revised sample arrives at buyer | Days 12–19 | Shipping |
| Total per round | ~2–3 weeks | Two rounds = 4–6 weeks; three rounds = 6–9 weeks; five rounds = 10–15 weeks |
The critical bottleneck: the buyer’s evaluation speed. Most projects lose 3–7 days per round because the buyer takes a week to review the sample and send feedback. If you evaluate within 48 hours of receiving the sample, you compress the total development timeline by 1–2 weeks per round.

FYBagCustom is Your Trusted Custom Bag Manufacturer in China, with 15+ years of manufacturing experience and a sample development process designed for two-round convergence. For brands developing custom handbags, our capabilities include:
Contact our development team to start your sample development — and receive a first sample, typically within 5–7 days.
Closing a custom handbag sample in two revision rounds is not about finding a factory that reads your mind. It is about writing feedback that leaves nothing to read. For B2B buyers developing custom handbags, three core takeaways:
If you are developing a custom handbag and want the sample process to converge in two rounds — not drift into five — contact FYBagCustom to discuss your tech pack, send your design, and receive a first sample in 5–7 days, with the structured revision process that turns your feedback into a finished product.
FYBagCustom delivers first samples in 5–7 days, responds to every revision item with documented corrections, and photographs every change before shipping — because two-round convergence starts with a factory that reads your brief like a specification, not a suggestion.
Start Your Custom Bag Project →