Tel/WhatsAapp:+86 18011919834
E-mail: chloe.x@fybagcustom.com

Tel/WhatsAapp:+86 18011919834
E-mail: chloe.x@fybagcustom.com
Send Your Inquiry Today

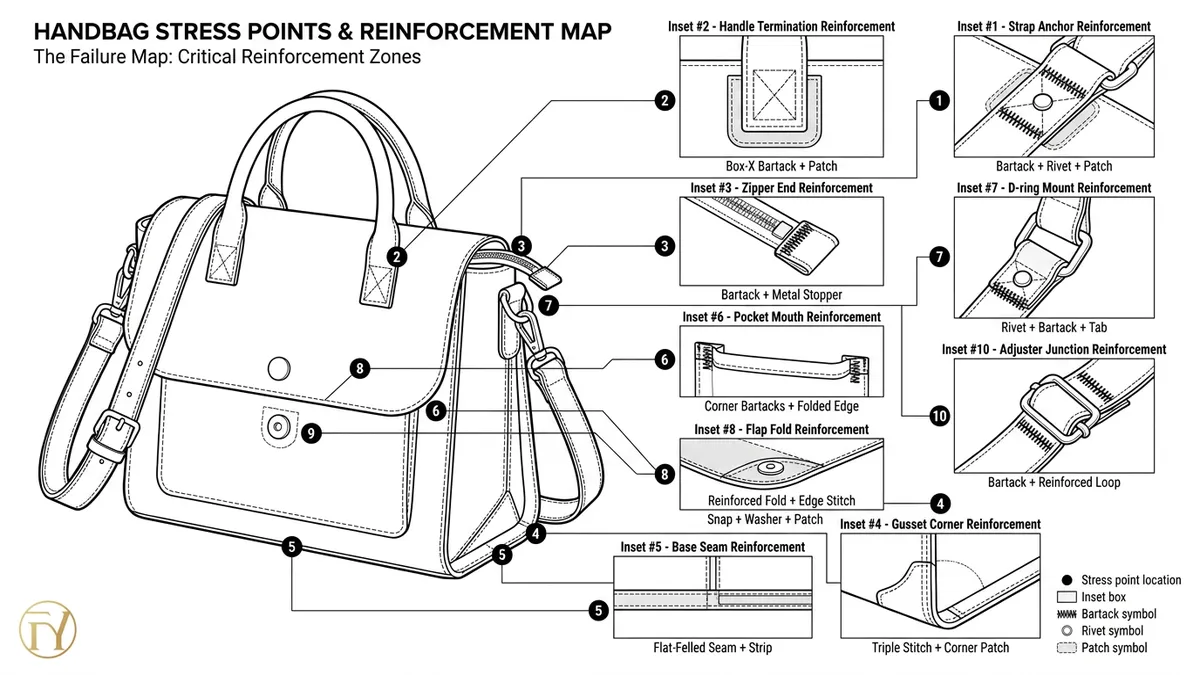
Who this guide is for: sourcing managers and product developers focused on durability and returns reduction — the readers who know that most warranty claims on a handbag line don’t scatter randomly across the product but cluster at a short, predictable list of stress points: strap anchors, zipper ends, gusset corners, bottom seams, pocket mouths, hardware mounts. That predictability is the opportunity. If the failures are mappable, they are preventable — each point has a known failure mechanism and a specific, inexpensive reinforcement technique (bartack, box-stitch, rivet, backing patch, seam tape) that neutralizes it, and the economics are lopsided in prevention’s favor: the reinforcement costs cents at production, while the failure it prevents costs the full return — refund, freight, handling, and the one-star review written by a customer whose bag broke after the trust was already given. This guide is the returns-reduction reference the brief calls for: the load-path logic that explains why failures cluster where they do, the ten-point failure map of a typical bag with the mechanism and the fix at each stop, the reinforcement-technique glossary behind the fixes, and the spec-and-inspection discipline that pairs with our QC playbook to turn the map into a standard.
Every bag that comes back under warranty tells the same short story in one of about ten versions: a load met a point that wasn’t built for it, repeatedly, until something let go. The strap anchor that carried four kilograms through eight months of commutes. The zipper end yanked at the same angle every morning. The base corner set down on concrete three times a day. None of these are freak events — they are the product’s routine life, arriving at the handful of locations where that life concentrates its forces.
This is the load-path insight that organizes everything in this guide: force enters a bag at the grip — handle or strap — travels through the anchors into the body, runs down the seams and gusset lines, and lands on the base, with side excursions at every point the customer operates (zips, snaps, pockets, adjusters). Failures cluster along that path, at the junctions where force changes direction or concentrates — and reinforcement engineering is simply the practice of finding those junctions on the pattern and building each one for the force it will actually meet. What follows is the map: the ten stops where bags predictably fail, the mechanism at each, and the fix.
Before the map, the arithmetic that justifies it — because reinforcement is sometimes value-engineered out by exactly the people this guide serves.
| Factor | The Asymmetry |
|---|---|
| The prevention cost | A bartack is seconds of machine time and centimeters of thread; a backing patch is an offcut; a rivet is a fitting — per-unit prevention across the full map costs a rounding error against the product’s landed cost |
| The failure cost | A warranty return consumes the refund, two legs of freight, handling, and the unit itself — typically the entire margin of several sold units, spent on one |
| The review asymmetry | Durability failures generate the category’s angriest reviews, because they arrive after trust — months in, past return windows, mid-use; a bag that fails at the strap anchor writes a review no marketing spend answers |
| The B2B multiplier | For a wholesale buyer, a stress-point defect is not one return but a batch conversation — a failure mode repeated across an order is a relationship cost |
| The spec conclusion | Reinforcement is the cheapest insurance in the product: the correct posture is a documented reinforcement standard applied to every style, not a per-style debate |
| Aspect | Detail |
|---|---|
| The mechanism | The anchor carries the bag’s full loaded weight at every carry, plus dynamic spikes — the lift, the shoulder-swing, the snatch off a chair; point load works the stitching and the body material until thread breaks or fabric tears through |
| The fix | Dense bartack or box-X stitching through a reinforcement tab or backing patch that spreads the load into the body; rivets with backing washers on heavy classes; the body material itself locally reinforced (an extra ply, a leather patch) where the base fabric is light |
| The spec line | Anchor rated to loaded-class weight plus a dynamic margin, cycle-tested — per our handle and strap guidance, where this point’s engineering lives in full |
| Aspect | Detail |
|---|---|
| The mechanism | The zip’s ends are stress risers: every opening pull terminates there, and on stuffed bags the closing force peaks exactly at the end-stop; the tape tears away from the seam, or the stop pulls off and the slider runs off the coil |
| The fix | Reinforced tacking across the tape at both ends; leather or fabric end-tabs capping the zip ends — absorbing the pull and giving the fingers a purchase that redirects force off the stop; on load-bearing zips (expansion gussets), engineered end anchors per our expandable-bag spec |
| The spec line | Zip ends tabbed or tacked on every style; stuffed-bag closing force applied in test, not just the empty glide |
| Aspect | Detail |
|---|---|
| The mechanism | The bag is set down thousands of times, and the base corners take the impact plus the abrasion of every surface they meet; seam junctions there concentrate three panels’ worth of allowances into one worked point |
| The fix | Corner backing patches inside; protective corner pieces (leather caps, metal corner guards on heritage builds) outside; seam allowances at the junction graded and secured; metal feet lifting the base off the surface entirely, mounted through into the base shaper per our structure guidance |
| The spec line | Corner-first inspection on every sample — the corners certify the build the way they do in our trim guidance |
| Aspect | Detail |
|---|---|
| The mechanism | Everything the bag carries bears on the base seam continuously; it is the highest sustained-load seam on the product, and it fails by stitch fatigue and seam-allowance tear-through |
| The fix | Double- or triple-stitched base seams; seam taping reinforcing the allowance; on heavy classes, the base seam backed by the base board so the load path lands on structure, not stitching alone |
| The spec line | Stitch density and thread spec (below) upgraded on base seams by weight class; the loaded-floor test from our gusset battery run on every structured sample |
| Aspect | Detail |
|---|---|
| The mechanism | The exterior slip pocket — the phone pocket — is operated dozens of times daily with a prying force at its top corners; unreinforced pocket corners tear open in exactly the arc the thumb makes |
| The fix | Bartacks at both top corners of every slip and patch pocket — the single highest-value-per-cent reinforcement on the map; elastic or bound pocket mouths where the pocket must grip contents |
| The spec line | No pocket sewn without corner tacks — a blanket rule cheaper to apply than to police style-by-style |
| Aspect | Detail |
|---|---|
| The mechanism | Hardware concentrates force through small footprints; a D-ring’s tab, a magnetic snap’s prongs, a foot’s post all work their mounting hole until the material around it yields — the snap that pulls through its panel is the everyday version |
| The fix | Backing washers and plates behind every pronged and posted fitting; mounting tabs bartacked through backing patches; welded (never open) rings per our strap-system standard |
| The spec line | No hardware mounted against unbacked single-ply material — the washer is part of the fitting, not an option |
| Aspect | Detail |
|---|---|
| The mechanism | A flap folds at the same line thousands of times; coatings crack there, fibers fatigue, and the closure hardware’s pull concentrates at the fold’s midpoint — the same flex-line physics our packable-bag guidance maps |
| The fix | Flex-rated materials at fold lines; the fold edge-stitched or scored so it creases where designed rather than wandering; closure hardware mounted through backed zones (per stop 6) offset from the fold itself |
| The spec line | Fold lines flex-cycle-tested on coated and printed materials; closure pull tested through the flap, not just at the fitting |
| Aspect | Detail |
|---|---|
| The mechanism | The slider, the webbing-to-leather end-tab, and the strap’s stitched terminations each carry the strap’s full load through a junction; end-tabs pull out and terminations unravel under cyclic load |
| The fix | Box-X stitching at strap terminations; end-tab junctions stitched through reinforcement and bartacked; slider-webbing pairing creep-tested per our strap-systems battery |
| The spec line | Every strap junction pull-tested to class load plus margin before the strap joins the wardrobe |
| Aspect | Detail |
|---|---|
| The mechanism | Where a handle’s run ends on the body — the stitch line’s last centimeter — the peel force of every lift concentrates; terminations fail by unzipping backward along the stitch line |
| The fix | Terminations backtacked and bartacked; on set-in handles, the termination captured under a trim or plate so peel force meets a mechanical stop |
| The spec line | Termination inspection at hand distance — the same zero-distance standard the handle’s touchpoint already demands |
| Aspect | Detail |
|---|---|
| The mechanism | The lining hangs from its attachment ring and pocket mounts; interior pocket corners and zip surrounds tear just as exterior ones do, and a torn lining reads as a broken bag even when the shell is perfect |
| The fix | Lining attachment seams secured; interior pocket corners tacked (stop 5’s blanket rule applies inside); interior zips end-tabbed; bound interior allowances per our French-binding guidance where the interior is on show |
| The spec line | The inside inspected to the same map as the outside — the turn-out inspection from our trim battery |
| Technique | What It Is | Where It Earns Its Keep |
|---|---|---|
| Bartack | A dense, narrow field of zigzag stitching — the point-load workhorse | Anchors, pocket corners, terminations, tabs — anywhere force concentrates on a stitch line |
| Box-X stitch | A stitched box with an X through it — spreading load across the box’s whole perimeter | Strap and handle terminations on webbing and flat mounts — the visible signature of load-rated stitching |
| Rivet | A mechanical fastener through all plies with a backing washer | Heavy-class anchors and heritage builds — the fix that doesn’t depend on thread at all |
| Backing patch / plate | A reinforcement layer (fabric, leather, or plastic plate) inside, behind the stress point | The load-spreader: converts point load into area load at anchors, hardware mounts, and corners |
| Seam tape | Reinforcing tape sewn into or over a seam allowance | Base and gusset seams on load-carrying builds; also the water-seal layer on waterproof construction |
| Bound seam | The allowance enclosed in binding | Durability and finish at once — the fray-proof interior per our trim guidance |
| Double/triple stitching | Parallel redundant stitch lines | Sustained-load seams — the base, the gusset lines on heavy classes |
| Backtack | Reversing the stitch at a seam’s start and end | The universal termination lock — cheap, mandatory, and the first thing skipped on rushed production |
| Edge coat / heat seal | Sealed cut edges on synthetics | Stops fray from starting where webbing and nylon are cut |
| Corner protector | External caps — leather, metal, or molded | The sacrificial armor at the set-down zone |
Reinforcement technique fails if the thread and stitch beneath it are under-spec’d — the invisible half of durability:
| Element | Specification |
|---|---|
| Thread | Bonded nylon or bonded polyester at a weight matched to the load class — the thread is the structure at every stitched stress point, and upgrading it costs almost nothing per unit |
| Stitch density | Stitches-per-inch specified by seam class: too sparse and each stitch overloads; too dense and the needle perforates the material into a tear line — the density is a spec, not an operator preference |
| Needle matching | Needle size matched to thread and material so holes are filled, not oversized |
| Stitch integrity at speed | Production-speed seams sampled and pulled — the seam that passes at sample speed can degrade at line speed if tensions drift |
The map only reduces returns if it becomes a document and a habit.
| Step | The Practice |
|---|---|
| The reinforcement standard | The ten points and their fixes written as a one-page standard applied to every style by default — deviations argued case-by-case, not compliance |
| The pattern-stage review | Each new design walked against the map at pattern stage: where does this style’s load path run, and which stops apply |
| The sample interrogation | Samples tested at the map’s points specifically — anchors pulled, zips yanked stuffed, corners dropped, pockets pried — rather than admired generally; this pairs directly with our QC playbook’s batteries |
| The production audit | In-line checks at the stops most often skipped under time pressure: backtacks, pocket tacks, backing washers — the cheap steps that vanish first when a line runs behind |
| The returns feedback loop | Warranty returns autopsied against the map — every failure either confirms a stop or reveals an eleventh, and the standard updates |
A sourcing manager can send a current style to our team for a stress-point audit against the map — the fastest way to see which stops an existing product is missing.
The stops apply universally; their weighting shifts by format:
| Format | The Priority Stops |
|---|---|
| Work tote | Anchors (1), base seam (4), corners (3) — the heavy-daily load path |
| Crossbody | Adjusters (8), anchors (1), phone pocket (5) |
| Backpack | Anchors (1) doubled, zip ends (2), base (4) — per the loaded-commuter life |
| Duffle / gym bag | Every load stop at heavy class — the map’s maximum case |
| Diaper bag | Anchors, pockets, hardware — operated more times daily than any format, for the mom and baby program |
| Structured handbag | Corners (3), flap fold (7), hardware (6) — per our frame-and-structure guidance |
| Clutch / evening | Closure line (7), lining (10) — light loads, high finish standards |
| Laptop bag | Base (4), anchors (1), zip ends (2) — the concentrated-weight case |
| Kids / lunch formats | Everything at blanket-rule level — the least careful users |
The application read-across: the map’s heavy cases serve the daily commuting, fitness, and travel programs where loads run highest; the operation-frequency cases serve mom and baby; and the finish-standard cases serve the gift and promotional occasion tier, where a failure is a spoiled gift.
| Check | Method | Standard |
|---|---|---|
| Anchor pull + cycle | Anchors loaded to class weight plus dynamic margin; cycled | No tear, pull-through, or stitch failure |
| Stuffed-zip test | The bag stuffed to capacity; zips closed and opened through cycles | Ends hold; no tape separation; slider tracks |
| Corner drop | The loaded bag corner-dropped at spec height, repeatedly | Corners intact; no seam burst at junctions |
| Pocket pry | Slip-pocket mouths pried through insertion cycles at the corners | Tacks hold; no corner tear |
| Hardware pull | Every pronged/posted fitting pulled against its backing | No pull-through; washers seated |
| Flap flex | The flap cycled at its fold line to rated count | No cracking, no wander, closure holds |
| Termination peel | Handle and strap terminations peel-tested | Backtacks and bartacks hold; no unzipping |
| Interior turn-out | The lining inspected against the map’s stops | Interior stops reinforced to the same standard |
| Thread and density audit | Seams sampled for thread spec and stitch density | On spec across the production run |
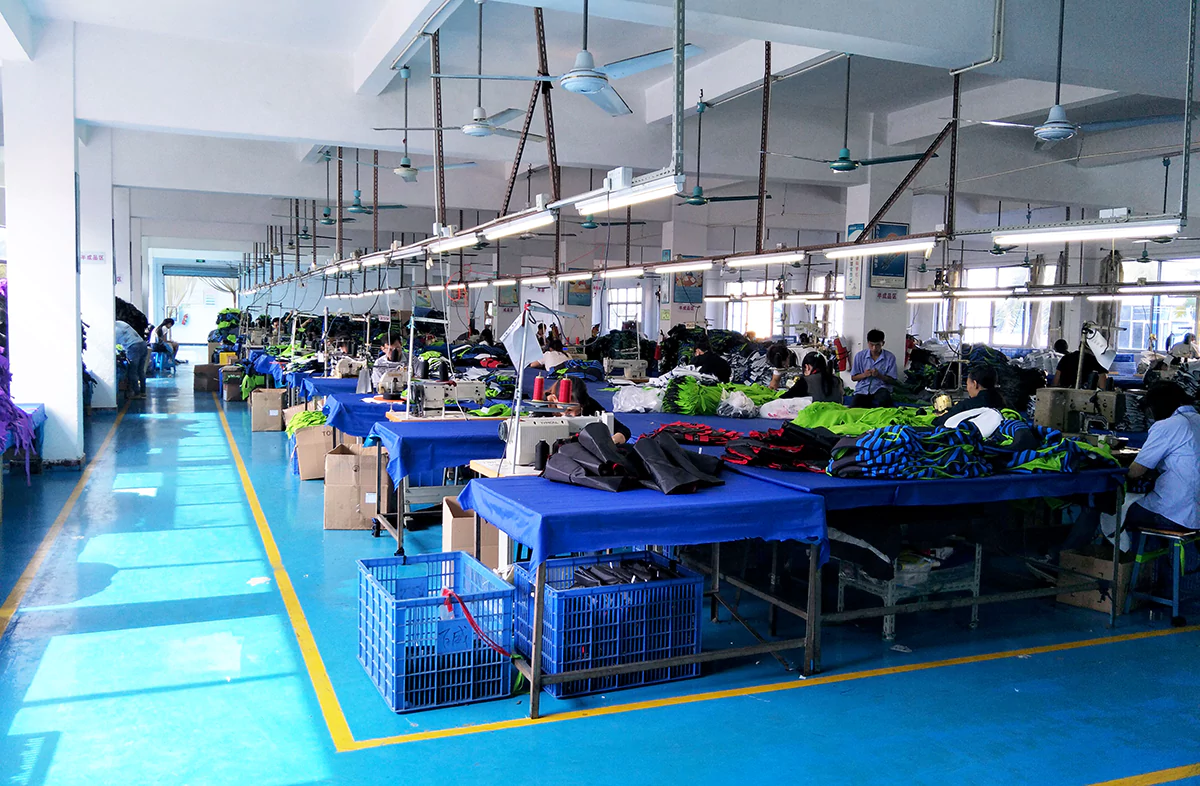
FYBagCustom is Your Trusted Custom Bag Manufacturer in China, with 15+ years of manufacturing experience and the reinforcement discipline that turns the failure map into a production standard. For sourcing managers and developers, our capabilities include:
Warranty returns cluster at a short list of stress points, and every point on the list has a known, inexpensive fix. For sourcing managers and product developers, three core takeaways:
If durability and returns reduction are on your spec sheet — contact FYBagCustom for the reinforcement standard or a stress-point audit of your current line, and receive map-reinforced, rig-tested samples in 7–10 days.
FYBagCustom builds to the ten-point failure map by default — bartacked, backed, tabbed, and rig-tested at every stress point — and audits existing lines against it. Cents of prevention, delivered as a documented standard. Samples in 7–10 days.
Start Your Custom Bag Project →