Tel/WhatsAapp:+86 13366396425
E-mail: chloe_xia@vleap.com.cn

Who this guide is for: first-time brand founders, aspiring designers, side-hustle entrepreneurs, Etsy and Shopify sellers, Amazon FBA beginners, fashion students, and anyone who has a handbag idea but no manufacturing experience. If you have ever looked at a bag on a shelf and thought “I could design something better” — but have no idea how to get from that thought to a finished product with your label inside — this guide walks you through every step, in order, with real costs, real timelines, and the honest realities that factory marketing pages do not tell you.

Every handbag brand that exists today started with a single person who decided to try. Not someone with a fashion degree, necessarily. Not someone with factory connections in China. Not someone with $100,000 in startup capital. Often, it was someone with an idea for a bag that did not exist, a willingness to learn a process she had never done before, and — critically — a manufacturer willing to produce small quantities for a brand that had zero track record.
This guide is written from that manufacturer’s perspective. After 15+ years of working with brand founders at every stage — from napkin sketches to million-unit annual programs — we have seen what works, what fails, and where first-time founders consistently waste time and money. The goal of this guide is not to sell you manufacturing services (though we will explain how we can help at the end). The goal is to give you the most honest, detailed, step-by-step roadmap available for turning a handbag idea into a real product with your name on it.
Every number in this guide is real. Every timeline is realistic, not optimistic. Every mistake we warn you about is one we have watched founders make — often more than once.
The most common first-time founder mistake is starting with the product: “I want to make a leather tote.” The more important starting point is the position: who is this tote for, why would she choose yours over the thousands already available, and what is she willing to pay?
Before contacting a single manufacturer, answer these seven questions in writing. Your answers become the creative brief that guides every subsequent decision.
| Question | Why It Matters | Example Answer |
|---|---|---|
| 1. Who is your target customer? | Determines materials, sizing, features, price | “Professional women aged 28–45 who commute to offices in U.S. cities” |
| 2. What problem does your bag solve that existing bags do not? | Your differentiation — the reason to exist | “No work tote combines a padded laptop sleeve, cosmetic pocket, AND looks like a designer handbag” |
| 3. What retail price range are you targeting? | Determines material budget, construction complexity, and manufacturer selection | “140 retail” |
| 4. Where will you sell? (channels) | Determines order volumes, packaging, compliance requirements | “Own Shopify site + Amazon FBA” |
| 5. What is your initial budget for development + first production run? | Determines MOQ negotiation leverage, sample investment, and how many styles you can afford to launch | “15,000 total for first production run including samples” |
| 6. What makes your brand visually distinctive? | Guides material selection, hardware, color, and branding | “Minimalist, muted earth tones, tonal debossed logo, no visible hardware branding” |
| 7. What is your timeline? | Determines whether sea freight or air freight, and how much development iteration you can afford | “Product in hand in 5 months; selling within 6 months” |
These answers are not academic exercises — they are the information your manufacturer needs to give you an accurate quote, recommend appropriate materials, and set realistic expectations. A founder who contacts a factory saying “I want to make bags” will get a generic response. A founder who sends a completed positioning questionnaire gets a specific, actionable conversation.
This is the step where most founders spend either too little time (emailing one factory on Alibaba and hoping for the best) or too much time (contacting 50 factories and getting paralyzed by conflicting information). The right approach is structured and efficient.
| Source | Pros | Cons | Best For |
|---|---|---|---|
| Alibaba / Made-in-China | Largest selection; easy to browse and compare | Quality varies enormously; many are trading companies, not actual factories | Initial research and shortlisting |
| Industry trade shows (Canton Fair, APLF) | Meet factories face-to-face; see samples in person | Expensive to attend; time-consuming; post-COVID frequency still rebuilding | Serious founders with travel budget |
| Referrals from other brand founders | Pre-vetted; real experience data | Limited pool; may not share contacts with perceived competitors | Founders with industry network |
| Manufacturer websites (direct) | See full capability portfolio; often higher-quality factories | Harder to discover; requires more targeted searching | Founders who know what they want |
| Sourcing agents | Handle communication, factory visits, QC on your behalf | Agent fees (5–15%); you depend on the agent’s judgment | Founders who cannot visit China and want a buffer |
| Question | What You’re Really Asking | Red Flag Answer |
|---|---|---|
| “Are you a factory or a trading company?” | Does this company actually manufacture bags, or do they broker? | Evasive answer; “we work with many factories” |
| “Can you send photos of your factory floor?” | Is this a real production facility? | Stock photos; refusal to share |
| “What is your MOQ per style per color?” | Can I afford the minimum order? | “10,000 pcs” (too high for startups); “1 pc” (too low to be a real factory) |
| “Can you send samples of bags you’ve made?” | What is the actual quality level? | Only renders or catalog images; no physical samples available |
| “What is your sample lead time and cost?” | How fast and how much for a prototype? | No clear answer; “free samples” (usually means trading company subsidizing to close a deal) |
| “Do you have experience with brands at my price tier?” | Can they execute at my quality level? | They only show ultra-cheap or ultra-luxury — no range match |
| “Can you handle Amazon FBA packaging and labeling?” | Do they understand my sales channel? | “What is FBA?” |
| Factory Type | Typical MOQ per Style per Color | Best For |
|---|---|---|
| Large factory (1,000+ workers) | 300–500 pcs | Established brands, volume orders |
| Mid-size factory (200–500 workers) | 100–300 pcs | Growth-stage brands, moderate volumes |
| Small-to-mid factory (50–200 workers) | 50–150 pcs | Startup brands, first runs, testing |
| Small workshop / atelier | 10–50 pcs | Ultra-small runs, luxury, bespoke |
For first-time founders, a factory with MOQ of 50–150 per style per color is the realistic target. Below 50, you are likely working with a workshop that may lack consistency; above 300, you are committing too much capital and inventory risk for an unproven product.
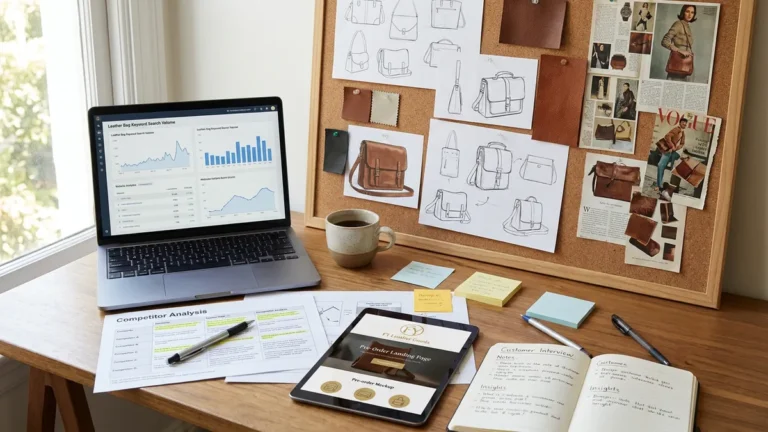
You do not need to be a trained designer to start a handbag brand. You need to be able to communicate what you want clearly enough for a factory’s pattern team to interpret it. That communication document is called a tech pack.
| Section | What to Include | How Detailed? |
|---|---|---|
| Sketches / reference images | Hand drawings, digital mockups, or photos of existing bags that show the shape you want | As detailed as you can — front, back, side, top views. Even rough sketches help |
| Dimensions | Width × height × depth in cm; handle drop length; strap length | Exact numbers — measure a bag you like if unsure |
| Materials | Exterior material (PU leather type, canvas weight, nylon), lining, padding | Name the material or send a swatch. “Leather-like” is not specific enough |
| Color | Pantone reference, hex code, or a physical swatch | A phone photo of “this color” is okay to start; Pantone confirmation happens at sampling |
| Hardware | Zipper type, closure type, D-rings, feet, finish (gold, silver, matte black) | Name the finish and function; the factory will recommend specific hardware models |
| Pockets and compartments | Interior layout: how many pockets, what type (zip, slip, padded), where they go | A simple interior sketch with labels is sufficient |
| Logo and branding | Logo file (vector/AI format), placement, technique (debossing, foil, embroidery), size | Provide your logo in .AI or .EPS. Specify where it goes and how it should be applied |
| Packaging | Dust bag, hang tag, polybag, box — what you need | Specify what you want; the factory will cost it separately |
Many successful brand founders cannot sketch. Three alternatives:

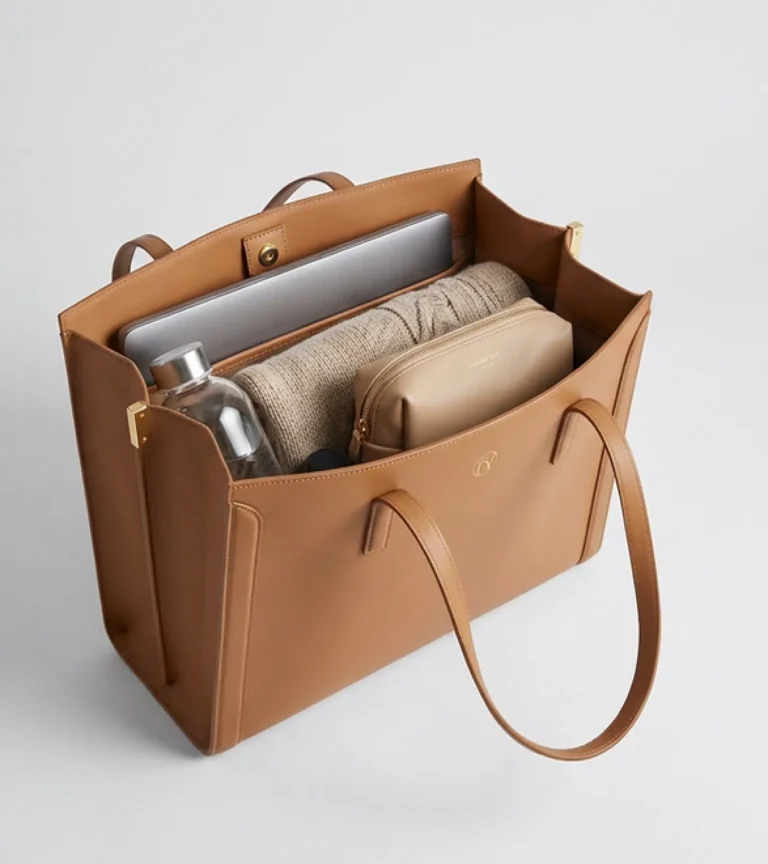
The sample is your first physical product. It is the moment where your idea becomes real — and the moment where you discover every assumption that was wrong. Sampling is not a formality; it is an active development process that typically requires 2–3 rounds of iteration.
| Stage | What Happens | Duration | Cost | What You Evaluate |
|---|---|---|---|---|
| Proto sample (first sample) | Factory creates the first physical bag from your tech pack | 5–7 days production + 3–5 days shipping | 150 per sample (varies by complexity) | Overall shape, proportions, size, compartment layout, basic quality |
| Revision notes | You review the proto and send detailed feedback on what to change | 1–3 days (your time) | No additional cost | Document everything — photos + written notes |
| Revision sample | Factory produces a corrected version based on your feedback | 5–7 days production + 3–5 days shipping | 100 (some factories offer one free revision) | Revised elements; confirm corrections; check for new issues |
| PP (pre-production) sample | The final, approved sample that becomes the locked reference for bulk production | 5–7 days | Often included in previous sample cost | Everything — this is your “golden sample” |
| Check Point | What to Look For | Tool Needed |
|---|---|---|
| Dimensions | ±1 cm of your specification on all measurements | Tape measure |
| Material quality | Color accuracy, texture match, surface consistency, no defects | Your eyes + comparison to approved swatch |
| Stitching | Straight, consistent stitch length, no loose threads, no puckering | Magnifying glass or close-up phone photos |
| Hardware function | Zippers slide smoothly, closures engage and release properly, handles feel secure | Your hands — open/close everything 20 times |
| Interior | Pockets correctly placed, lining smooth, no exposed raw edges | Open the bag fully and inspect every seam |
| Logo / branding | Correct size, position, technique (debossing depth, foil clarity, embroidery neatness) | Compare to your logo file at the specified scale |
| Weight | Weigh the empty sample | Kitchen scale |
| Overall feel | Does this feel like a bag you would pay your target retail price for? | Honest self-assessment |
After inspecting every technical detail, step back and ask one question: “If I saw this bag in a store at my target retail price, with no knowledge of the brand, would I buy it?” If the answer is not an immediate “yes,” identify what is causing hesitation and send those notes to the factory. Do not approve a sample you would not buy yourself. Your customer is at least as critical as you are.
Cost transparency is where first-time founders most often feel lost. The total cost of getting your product to market includes several layers beyond the factory’s per-unit price.
| Cost Layer | What It Includes | Typical Range (for a first run of 100–200 units) | When You Pay |
|---|---|---|---|
| Samples | 2–3 rounds of proto + revision + PP samples | 400 total | Before bulk order |
| Tooling (if any) | Custom debossing die, custom hardware molds, custom zipper pulls | 300 (simple deboss die: 80; custom hardware mold: 300) | Before bulk order; one-time |
| Bulk production (FOB) | Per-unit manufacturing cost × quantity | 40 per unit × 100–200 units = 8,000 | 30% deposit at order; 70% before shipment |
| Shipping (sea freight) | Container or LCL (less than container load) to your port | 5 per unit for LCL; 3,000 for a shared container | At shipment |
| Shipping (air freight) | Faster but more expensive | 15 per unit | At shipment |
| Customs duties | Import duty on bags (varies by material and HTS code; typically 5–20%) | 6 per unit | At customs clearance |
| Domestic logistics | Freight from port to your warehouse or FBA | 2 per unit | At delivery |
| Total landed cost per unit | All of the above combined | 55 per unit (depending on bag complexity and shipping method) | — |
| Calculation | Example (mid-range PU leather tote) |
|---|---|
| Landed cost per unit | $22 |
| Wholesale price (2–2.5× landed) | 55 |
| Retail price (4–5× landed, or 2× wholesale) | 110 |
| Target margin at retail (DTC) | 75–80% gross margin |
| Target margin at wholesale | 50–55% gross margin |
If your landed cost exceeds 25% of your target retail price, either the bag needs to be simplified (cheaper materials, fewer features) or the retail price needs to increase. This is the math that determines whether the business is viable — run it before approving bulk production, not after.
Once the PP sample is approved and costs are confirmed, you place the bulk order. This is the largest financial commitment in the process.
| Item | Status Before Ordering |
|---|---|
| PP sample approved in writing (email confirmation to factory) | ✓ Required |
| All materials, colors, and hardware confirmed with swatch references | ✓ Required |
| Logo die or branding artwork finalized and approved on sample | ✓ Required |
| Packaging specifications confirmed (dust bag, hang tag, polybag, box) | ✓ Required |
| Total quantity by style, by color confirmed | ✓ Required |
| FOB price per unit confirmed in writing | ✓ Required |
| Payment terms agreed (typically 30% deposit, 70% balance before shipment) | ✓ Required |
| Shipping method selected (sea vs. air) and logistics partner identified | ✓ Required |
| Timeline confirmed: production start → completion → shipment → arrival | ✓ Required |
| Stage | Duration | Notes |
|---|---|---|
| Material procurement (factory sources your materials) | 7–14 days | Longer if custom-color PU or specialty material |
| Cutting + production | 20–35 days | Depends on quantity and complexity |
| QC inspection | 3–5 days | 100% or AQL sampling inspection |
| Packing + shipping preparation | 3–5 days | Includes FBA labeling if applicable |
| Sea freight to U.S. | 25–35 days | East Coast ~35 days; West Coast ~25 days |
| Air freight to U.S. | 5–8 days | 3–5× the cost of sea freight |
| Customs clearance + domestic delivery | 3–7 days | Customs broker handles clearance |
| Total: order to product in hand | 60–100 days (sea) or 40–70 days (air) | Plan for the longer end of each range |
QC is where first-time founders most often cut corners — and where cutting corners costs the most. A single production batch with a consistent defect (wrong color, misaligned logo, faulty zipper) can destroy your launch and generate returns that exceed your margin.
| Option | What It Is | Cost | Best For |
|---|---|---|---|
| Factory self-inspection | The factory’s own QC team inspects before shipment | Included in production cost | Established, trusted factory relationships |
| Third-party inspection (e.g., QIMA, V-Trust, Asia Inspection) | Independent inspector visits the factory, checks a statistical sample | 400 per inspection | First-time orders; high-value orders; when you cannot visit personally |
| Personal visit | You or your agent visits the factory during production | Travel cost | Founders who want maximum control; large orders |
For your first order, a third-party inspection is strongly recommended. It costs 400 and provides an independent report with photos documenting the quality of your finished goods before they ship. If defects are found, you can negotiate corrections before the bags leave China — vastly cheaper than dealing with returns after they reach your customers.
Your bags are produced, inspected, shipped, and sitting in your warehouse or FBA facility. Now the work shifts from manufacturing to marketing.
| Priority | Why | Action |
|---|---|---|
| Product photography | Photos sell bags online — not descriptions, not features, photos | Invest in professional white-background shots + 2–3 lifestyle images; show the interior, the details, the scale on a model |
| Product page copy | Every word must address a purchase hesitation | Lead with the problem the bag solves; include dimensions, materials, weight; answer every question the customer might ask |
| Pricing strategy | Price reflects positioning, not just cost | Do not underprice to “attract first customers” — it trains the market to expect low prices and destroys your margin permanently |
| First reviews | Reviews are the most important conversion factor for a new brand | Send bags to 10–20 friends, family, or micro-influencers with an honest request for reviews; provide links |
| Inventory management | Do not overbuy on your first order | Order 100–200 units maximum for your first run; prove demand before scaling |
Your first production run is a learning exercise, not the final product. The data you gather from sales, returns, reviews, and customer feedback should inform your second order.
| Data Point | What It Tells You | Action for Next Order |
|---|---|---|
| Return reasons | Which features or specifications failed | Fix the top 3 return reasons in revision sample |
| Customer reviews (positive) | Which features customers love most | Emphasize these in marketing; preserve them in next production |
| Customer reviews (negative) | Which features disappoint | Address in tech pack revisions; discuss with factory |
| Best-selling color | Which colorway the market prefers | Increase allocation for that color; test one new color |
| Sales velocity | Whether demand supports reorder and/or expansion | If 100 units sell in 60 days → reorder 200; if 100 units sell in 180 days → hold and investigate |
| Photography performance | Which product images drive clicks and conversions | Double down on image styles that perform; reshoot underperformers |
| Path | What It Means | Best For | Time to First Product | Cost | Risk |
|---|---|---|---|---|---|
| OEM (Original Equipment Manufacturing) | You provide the complete design (tech pack); factory produces exactly to your spec | Founders with a specific, unique design they want to bring to life | 3–5 months (from tech pack to delivery) | Higher — custom pattern development | Higher — untested design |
| ODM (Original Design Manufacturing) | Factory offers existing designs that you customize (material, color, hardware, branding) | First-time founders who want speed and lower risk; founders testing the market | 2–3 months (from selection to delivery) | Lower — no pattern development cost | Lower — design is already production-tested |
For first-time founders, ODM is the recommended starting path. You select from the factory’s existing proven designs, customize the material, color, hardware, and branding to make it yours, and launch with a product that has already been production-tested — dramatically reducing the risk of construction errors, fit issues, and proportion problems that plague first-time OEM designs. Once your first ODM collection proves demand and generates revenue, you can invest in fully custom OEM designs for your second or third collection.

FYBagCustom is Your Trusted Custom Handbag Manufacturer in China, with 15+ years of experience helping first-time founders and startup brands bring their handbag ideas to market. Our support for new brands includes:
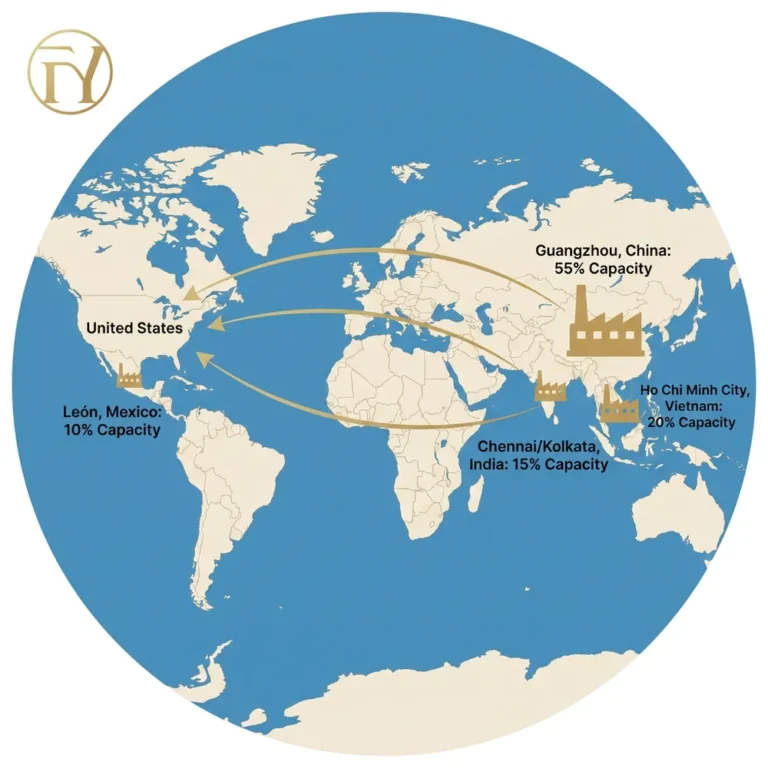
Our 50,000 m² factory in Guangzhou with 10+ production lines, 500+ professional staff, and 15+ years of experience has helped launch hundreds of brands — from single-style first orders to full multi-category collections. We understand that your first production run is the foundation of your brand, and we treat it with the same care and precision as a 10,000-unit repeat order.
Launching a handbag brand is not mysterious and it is not easy. It is a sequence of concrete, learnable steps — each with predictable costs, timelines, and decision points. For aspiring founders, three final takeaways:
If you have a handbag idea and you are ready to take the first concrete step, contact FYBagCustom. Send us your sketches, reference images, or just your answers to the seven positioning questions in Step 1 — and we will respond with material recommendations, ODM options that match your vision, and a transparent quotation, typically within 48 hours. Every brand starts somewhere. Most of them start with a single email.
FYBagCustom’s team has helped hundreds of first-time founders launch handbag brands — from a sketch on a napkin to products on shelves. Send us your idea, your sketches, or just your questions, and we’ll help you take the first step with ODM options, material recommendations, low MOQ, 5–7 day samples, and transparent pricing.
Start Your Custom Bag Project →